

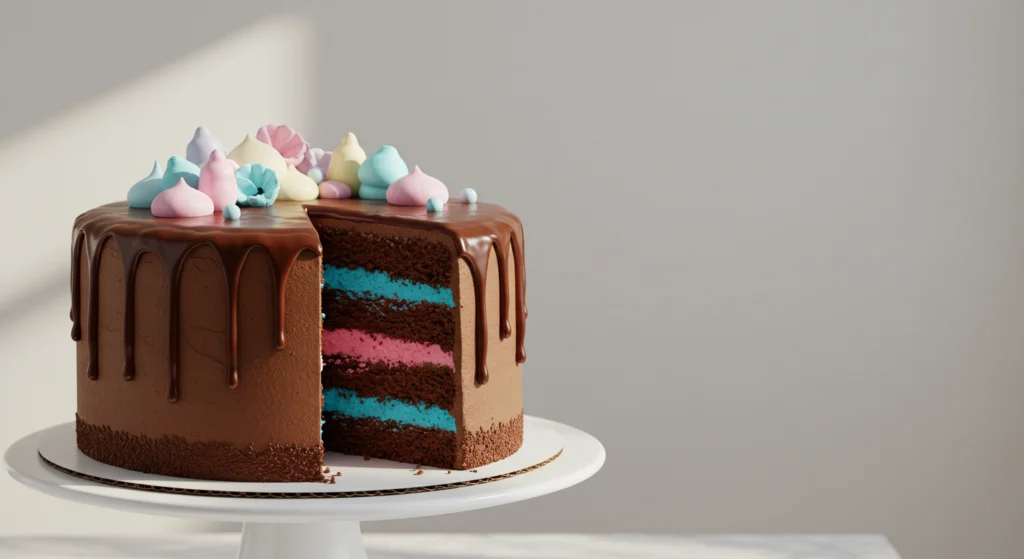
A gender reveal cake is more than just a dessert; it’s a sweet and exciting way to share one of life’s biggest surprises with your loved ones. These cakes have become a popular centerpiece at gender reveal parties, combining creativity, anticipation, and delicious flavor into one memorable moment. What makes a gender reveal cake truly magical is the hidden surprise inside—whether it’s pink for a girl or blue for a boy, the reveal is both visually stunning and emotionally thrilling.
In this blog post, we’ll show you how to take this trend to the next level with a decadent chocolate gender reveal cake. Perfect for chocolate lovers, this cake pairs rich, moist layers with a hidden center that unveils the big news in a delightful and unexpected way. Whether you’re a seasoned baker or just starting out, our step-by-step guide will help you create a show-stopping cake that will wow your guests and make your celebration unforgettable.
Let’s dive in and bake some joy into your gender reveal celebration!
Table of Contents
What Makes a Chocolate Gender Reveal Cake Special?
Ideal for Gender Reveal Parties
A chocolate gender reveal cake is an ideal choice for any gender reveal party, combining both a visual spectacle and a delectable treat that suits all types of celebrations. Gender reveal parties have become a cherished tradition for expecting parents to share their exciting news with friends and family, and the cake is often the central focus of this momentous occasion. With its rich flavors and hidden surprise, a chocolate cake brings an element of fun and anticipation that aligns perfectly with the spirit of the celebration.
The beauty of a chocolate gender reveal cake is its versatility in matching any party theme, whether it’s an elegant, minimalistic gathering or a whimsical, playful event. The deep brown color of the chocolate cake serves as a neutral base that pairs wonderfully with various decorating styles. You can choose from a simple frosting design or go all out with intricate patterns, fondant shapes, and colorful decorations. The cake’s color and decoration can be tailored to suit the gender reveal theme, from gender-neutral options for a surprise reveal to vibrant pinks and blues for a more traditional approach.
Beyond the appearance, chocolate is a crowd-pleaser, ensuring that everyone will enjoy a slice. Its rich, comforting flavor is familiar and universally loved, making it an excellent choice for guests of all ages. Plus, with so many options for customizations (like adding chocolate chips, caramel fillings, or even a layer of fruit), you can easily tailor the flavor profile to your guests’ preferences, ensuring your gender reveal cake satisfies both the eyes and the taste buds.
Another reason why a chocolate gender reveal cake is perfect for gender reveal parties is its element of surprise. As the cake is cut, the hidden surprise inside becomes the showstopper, creating a collective moment of excitement and joy. Whether it’s the revelation of pink or blue filling or the dramatic fall of colored sprinkles, this special moment adds a thrilling touch to the party, making the reveal not just a celebration of gender but an unforgettable experience for everyone involved.
The cake also doubles as an interactive way for guests to engage with the event. Taking photos as the cake is cut, capturing the reactions of the parents-to-be, and sharing the moment on social media helps to preserve the excitement. In short, a chocolate gender reveal cake is the perfect centerpiece to tie together the flavors, fun, and excitement of a gender reveal party, making it a memorable occasion for everyone involved.
A Perfect Blend of Flavor and Fun
A chocolate gender reveal cake is the ultimate combination of flavor and excitement, making it a standout treat at any gender reveal party. The rich, indulgent taste of chocolate appeals to a wide range of guests, from kids to adults, ensuring that everyone can enjoy a slice. The deep, cocoa flavor offers a satisfying balance of sweetness and richness, creating the perfect backdrop for the big reveal.
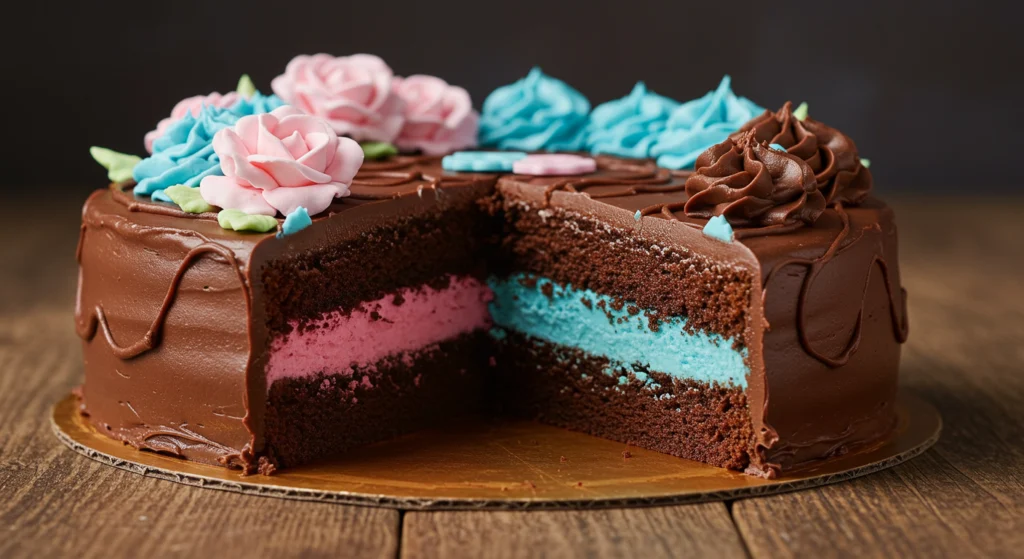
The fun comes in with the cake’s hidden surprise—an element of suspense and joy that heightens the moment when the cake is cut. Whether you choose to fill the center with vibrant pink or blue sprinkles, icing, or even a creamy filling, the excitement of seeing the gender unfold adds an extra layer of joy to the occasion. This element of surprise is what makes gender reveal cakes so special—they’re not just a dessert, but an interactive experience that engages your guests and creates lasting memories.
Beyond the traditional pink and blue color scheme, the versatility of a chocolate gender reveal cake allows for endless creative possibilities. From adding fun decorations like edible glitter, fondant designs, or themed cake toppers, the cake becomes more than just a treat—it becomes a centerpiece that ties the entire celebration together. Whether you’re opting for a simple yet elegant design or a more elaborate, themed cake, this dessert promises to be both a delicious treat and a conversation starter at your gender reveal party.
Hidden Surprise Inside the Cake
The hidden surprise inside a chocolate gender reveal cake is what truly makes this dessert unforgettable. It’s not just about baking a delicious cake; it’s about creating an exciting, suspenseful moment that your guests will remember for years to come. The surprise element is designed to build anticipation and excitement, making the act of cutting the cake a thrilling reveal of the baby’s gender.
There are several ways to incorporate a hidden surprise, each adding its own touch of magic to the moment. One of the most popular methods is to place colored sprinkles or small candies in the center of the cake. When the cake is cut, the vibrant pink or blue pieces tumble out, revealing the gender in a dramatic yet fun way. The soft, rich chocolate layers surround the colorful reveal, making the moment even more striking.
Another fun and slightly more elaborate approach involves using a surprise filling, like colored buttercream or a smooth custard, hidden beneath the layers of frosting. This creates an unexpected burst of color when the first slice is cut, adding another layer of excitement to the reveal. For a twist, you can even use a combination of colors, such as pink and blue layers, which remain hidden until the cake is sliced, adding an element of surprise that is equally visually stunning and emotionally impactful.
Not only does the hidden surprise make the gender reveal more interactive, but it also adds a unique touch to the cake that guests won’t soon forget. Whether you choose a simple sprinkle surprise or a more intricate colored filling, this element transforms a regular chocolate cake into a centerpiece for one of life’s most special moments. It’s the perfect way to share your happy news while also delighting your guests with a delicious treat.
Ingredients and Tools You’ll Need
Essential Ingredients for the Cake Base
Creating a perfect chocolate gender reveal cake starts with the right foundation: a moist, rich, and flavorful cake base. The ingredients you choose will play a pivotal role in the texture, flavor, and overall success of your cake. Let’s break down the essential ingredients needed to make a delicious chocolate cake that will wow your guests and make the reveal moment even sweeter.
- Flour
The base of any cake, flour provides structure and helps the cake rise. For a moist, fluffy chocolate cake, all-purpose flour is a great choice. You can also substitute a portion of the flour with cake flour for a lighter texture. Ensure that you measure the flour correctly (by spooning it into the measuring cup and leveling it off) to avoid making the cake too dense. - Cocoa Powder
The star ingredient for a chocolate cake is, of course, cocoa powder. Opt for high-quality unsweetened cocoa powder for the richest flavor. Dutch-processed cocoa gives the cake a smoother, less acidic taste, while natural cocoa can add a more robust, bitter chocolate flavor. Mixing cocoa powder into the dry ingredients ensures an even distribution throughout the batter, resulting in a rich, chocolatey flavor in every bite. - Sugar
Sugar adds sweetness and moisture to the cake, as well as contributing to its tenderness. Granulated sugar is the most common choice, but brown sugar can be used for a slightly caramelized flavor and extra moisture. The sugar also helps the cake rise, as it interacts with the baking soda or powder to create a light, airy texture. - Butter
Butter provides richness, moisture, and flavor, giving the cake its soft, tender crumb. For the best results, use unsalted butter to control the salt content in the cake. Make sure the butter is softened to room temperature before mixing to ensure it blends smoothly with the sugar, creating a creamy, airy batter. - Eggs
Eggs are crucial in binding the ingredients together and helping the cake set during baking. They also contribute to the structure and moisture of the cake. Room temperature eggs are ideal, as they mix more evenly into the batter. Be sure to beat them well to help incorporate air, which results in a fluffier cake. - Baking Soda and Baking Powder
Both baking soda and baking powder are leavening agents that help the cake rise. Baking soda reacts with acidic ingredients, like cocoa powder, to provide lift, while baking powder ensures an even, consistent rise. Using the right balance of these ingredients ensures a light, fluffy texture rather than a heavy or dense cake. - Buttermilk or Milk
Buttermilk is a common ingredient in chocolate cake recipes because its acidity helps tenderize the cake and enhances the chocolate flavor. It also reacts with the baking soda to give the cake an even rise. If you don’t have buttermilk on hand, you can easily substitute it with whole milk or even make your own by adding a splash of vinegar or lemon juice to regular milk. - Vanilla Extract
Though chocolate is the star of this cake, a splash of vanilla extract enhances the overall flavor profile and balances the richness of the cocoa. It adds depth and complexity to the taste, making your cake taste fuller and more well-rounded. - Salt
A small amount of salt is essential in chocolate cake recipes to help balance the sweetness and bring out the flavors of the other ingredients. It acts as a flavor enhancer and also helps control the texture, ensuring that the cake is moist but not overly dense.
By using these essential ingredients, you’ll create a chocolate cake base that’s rich, moist, and flavorful—perfect for surprising your guests with the hidden reveal inside. These simple ingredients come together to form a delicious, irresistible cake that will set the tone for the celebration and leave everyone eagerly awaiting the big moment.
Tools for a Flawless Cake
Achieving a flawless chocolate gender reveal cake requires more than just the right ingredients—it also involves having the proper tools to create a perfectly baked, beautifully decorated dessert. The right tools make the process smoother, more efficient, and ensure that your cake turns out just as you envisioned. Let’s explore the essential tools you’ll need to bake and decorate your cake like a pro.
- Mixing Bowls
A set of mixing bowls is essential for combining your dry and wet ingredients separately before mixing them together. Opt for large, sturdy bowls that can comfortably hold the batter without splattering. Stainless steel or glass bowls are excellent choices as they’re non-reactive and easy to clean. Having multiple bowls allows for more efficient preparation, especially when working with different ingredients like dry flour and cocoa or wet butter and eggs. - Measuring Cups and Spoons
Accurate measurements are key to baking a cake that has the perfect texture and flavor. Invest in a set of measuring cups (both dry and liquid) and spoons to ensure precision when adding ingredients like flour, cocoa powder, baking soda, and liquids. Make sure to measure the flour by spooning it into the cup and leveling it off to avoid using too much flour, which could make the cake dense. - Electric Mixer (Handheld or Stand)
A handheld electric mixer or a stand mixer is an invaluable tool for mixing cake batter efficiently and evenly. A stand mixer is particularly helpful if you’re making large quantities of batter or mixing thick batters that require more power. If you’re working with a handheld mixer, ensure it’s powerful enough to blend ingredients quickly without splattering. Proper mixing incorporates air into the batter, resulting in a fluffier, lighter cake. - Cake Pans (Round or Square)
The right size and type of cake pan are crucial for even baking. Typically, round pans (8-inch or 9-inch in diameter) are used for gender reveal cakes to create multiple layers. Make sure to grease and flour your pans or line them with parchment paper to prevent the cake from sticking. If you’re going for a multi-layered design, you’ll need at least two pans of the same size to bake the cake layers simultaneously. - Parchment Paper
Lining your cake pans with parchment paper is a simple trick that ensures your cake layers come out smoothly without sticking. Cut the parchment to fit the bottom of the pan, then grease the sides of the pan to guarantee a non-stick surface. This helps when you need to carefully remove the layers for stacking and frosting. - Cooling Rack
Once your cake layers are out of the oven, a cooling rack is essential for allowing them to cool evenly and quickly. Placing your cakes on a wire rack prevents them from becoming soggy as they cool. This is especially important if you plan to frost the cakes, as warm cake can melt your frosting and cause it to slide off. The cooling rack ensures that air circulates around the cake, keeping it from getting damp. - Offset Spatula and Bench Scraper
For smooth, even frosting, an offset spatula is a must. It allows you to spread frosting with precision and avoid scraping the sides of the cake. An offset spatula provides control, whether you’re frosting the top or smoothing the sides. A bench scraper is another useful tool for achieving a flawless, professional-looking finish, especially when you want perfectly smooth sides or sharp edges. It’s great for cleaning up excess frosting and ensuring the cake looks neat. - Piping Bags and Tips
If you want to add intricate details to your chocolate gender reveal cake, such as decorative borders or piped designs, piping bags with different tips are essential. The right piping tip can help you create everything from smooth rosettes to playful writing or even intricate floral patterns. For a gender reveal cake, you may want to use piping to add small details, such as the words “It’s a boy!” or “It’s a girl!” or to create decorative accents along the edges. - Turntable
A cake turntable can make frosting your cake a much easier task, especially when you’re working on a layered cake. It allows you to rotate the cake while you frost it, ensuring even coverage and smoothness. This tool is especially useful when you’re working on detailed decorations or want to make sure the sides of the cake are perfectly frosted. If you plan on using fondant or creating precise designs, a turntable will help you maintain control as you work. - Cake Tester or Toothpick
A cake tester or a simple toothpick is essential for checking the doneness of your cake layers. Insert it into the center of the cake, and if it comes out clean or with a few moist crumbs, the cake is done. This step helps prevent overbaking or underbaking, ensuring a perfect texture for your chocolate cake. - Decorative Cake Stand or Plate
Once your cake is frosted and decorated, presenting it on a decorative cake stand or plate adds that extra touch of elegance. A cake stand elevates your cake, literally and figuratively, giving it a place of honor at your gender reveal party. Whether you go for a simple pedestal or something more elaborate, this stand will make your cake the star of the event.
By using these essential tools, you ensure that your chocolate gender reveal cake is flawlessly baked, beautifully decorated, and ready to impress your guests. Whether you’re an experienced baker or just starting out, having the right equipment is the key to achieving a cake that looks as good as it tastes.
Extra Decorations for the Perfect Finish
The decorations on a chocolate gender reveal cake are what take it from a simple dessert to a show-stopping centerpiece that will leave a lasting impression on your guests. While the rich, chocolatey layers and the hidden surprise inside are already exciting, adding extra decorative touches can elevate the entire experience, making your cake even more memorable. Whether you want to keep it simple and elegant or go all out with fun, creative details, there are plenty of ways to customize your cake for the perfect finish.
- Frosting Techniques
The frosting on your chocolate gender reveal cake is just as important as the cake itself. A smooth layer of frosting can provide a flawless finish, but you can take it a step further by experimenting with different frosting techniques. For a sleek, modern look, use an ombre effect where the frosting gradually transitions from one color to another, or opt for a smooth, perfectly even layer of buttercream. For a more textured look, try a ruffled effect, where the frosting is piped onto the cake in layers that resemble gentle folds of fabric. These techniques can add dimension and visual interest to your cake. - Fondant Accents
Fondant is a versatile ingredient that can be molded into almost any shape, allowing you to create detailed decorations like bows, flowers, hearts, or even little baby-themed figures. If you want to give your chocolate gender reveal cake a polished, professional look, consider using fondant for intricate decorations. You can create a fondant ribbon around the base of the cake or make small fondant shapes, like baby booties or a pacifier, to enhance the theme. Fondant can also be used to create a smooth, flawless coating for the entire cake if you prefer a more refined finish. - Edible Glitter and Sprinkles
For a touch of fun and sparkle, add some edible glitter or sprinkles to your chocolate gender reveal cake. Edible glitter comes in a variety of colors, including pink, blue, and gold, and can be lightly dusted on the frosting to create a glamorous, shimmering effect. Sprinkles are another popular option, offering both visual appeal and texture. You can use them to line the edges of the cake, create a playful pattern on top, or sprinkle a small handful over the reveal spot to draw attention to the hidden surprise. Glitter and sprinkles not only add a festive vibe but also enhance the visual impact of the reveal. - Themed Cake Toppers
A cake topper is an easy way to add a unique touch to your chocolate gender reveal cake. Whether it’s a personalized message like “It’s a boy!” or “It’s a girl!” or a more whimsical topper such as a baby bottle or a stork carrying a bundle, cake toppers help tie the theme of the celebration into the cake. Choose a topper that suits the tone of your party—whether you’re going for cute, elegant, or fun. If you’re feeling creative, you can even craft your own cake topper using paper, wood, or acrylic materials, personalized to reflect your style and the big reveal. - Fresh Flowers and Greenery
For an elegant touch, fresh flowers and greenery can make your cake look stunning and sophisticated. Consider using simple baby’s breath, small roses, or greenery like eucalyptus to adorn the top or sides of your cake. Fresh flowers can add a natural, rustic look to the design, which pairs beautifully with a chocolate cake’s rich, dark tones. Just make sure that the flowers you choose are edible or non-toxic, and keep them away from the area where the cake will be cut to avoid any contact with the food. - Drip Decor
If you want a trendy, modern look for your chocolate gender reveal cake, adding a drip effect is an easy yet impactful decoration. A chocolate ganache drip, created by melting chocolate and allowing it to drip over the edges of the cake, adds a decadent, drippy effect that complements the chocolate theme. You can also experiment with colored drips using pink or blue ganache to match the gender reveal theme. The contrast between the rich, dark chocolate and the bright drips creates a stunning visual effect that is sure to capture attention. - Personalized Text or Messages
To add a personal touch to your cake, consider writing a special message on top using piped frosting or edible markers. You could add a simple “Baby [Last Name]” or “It’s a boy/girl!” to the cake, or something more creative, like the due date or a sweet quote about the baby. Personalized messages make the moment even more memorable and tie the entire theme of the reveal together. You can even use a combination of hand-lettered script and bold fonts for visual contrast. - Colored Buttercream Swirls or Rosettes
For a more intricate and visually appealing look, try decorating your cake with buttercream rosettes or swirls. These can be done in soft pastel colors to match the gender reveal theme, or you can choose shades of white, cream, or metallic for a more sophisticated finish. Buttercream decorations add texture and depth to the cake, making it look not only beautiful but also inviting. These swirls can be placed around the top and bottom edges of the cake or on the entire surface, depending on how dramatic you want the effect to be. - Themed Cake Boards
The cake board is often overlooked, but it plays a crucial role in the presentation. A customized or themed cake board can tie together your overall party aesthetic. Consider a simple metallic gold or silver cake board for a modern, elegant look, or use a patterned board that features baby-themed illustrations like onesies, baby bottles, or tiny footprints. A clean, well-decorated cake board enhances the cake’s appearance and helps highlight its design.
By incorporating these extra decorations, you can elevate your chocolate gender reveal cake to new levels of creativity and excitement. Whether you’re adding subtle touches like glitter and sprinkles or going all out with fondant accents and a drip effect, these decorations will ensure that your cake isn’t just a dessert—it’s the highlight of the celebration. Every element will help create a perfect, memorable finish that everyone will remember long after the reveal.
Step-by-Step Guide to Making the Chocolate Gender Reveal Cake
Preparing the Cake Batter
Preparing the cake batter is a critical step in ensuring that your chocolate gender reveal cake turns out moist, fluffy, and delicious. The way you combine and mix the ingredients plays a significant role in the cake’s texture and flavor, so it’s essential to follow the process carefully. Let’s dive into the steps and tips for making the perfect chocolate cake batter that will create the ideal base for your gender reveal surprise.
- Sift the Dry Ingredients
Before mixing, it’s important to sift your dry ingredients—such as flour, cocoa powder, baking soda, and salt—together. Sifting helps break up any clumps, particularly in the cocoa powder, and ensures that the dry ingredients are evenly distributed. This step also aerates the flour and cocoa, which helps produce a lighter, fluffier cake. In addition to sifting, make sure to measure your flour properly by spooning it into the measuring cup and leveling it off to avoid adding too much, which could result in a dense cake. - Creaming the Butter and Sugar
In a large mixing bowl, start by creaming together the butter and sugar. This step is crucial for incorporating air into the batter, which gives the cake its light texture. Using an electric mixer on medium speed, beat the butter and sugar together until the mixture is pale and fluffy. This process usually takes about 3-5 minutes. Make sure the butter is at room temperature before starting—this ensures it blends smoothly with the sugar. The result should be a soft, airy mixture that is light in color. - Adding the Eggs
After the butter and sugar are well combined, add the eggs, one at a time, to the creamed mixture. It’s important to add them gradually because this helps ensure that each egg is fully incorporated before adding the next. Beat the mixture until it’s smooth and creamy after each addition. Eggs help bind the batter together and contribute to the cake’s structure. For best results, make sure the eggs are also at room temperature to prevent the batter from curdling. - Incorporating the Dry Ingredients
With the wet ingredients prepared, it’s time to begin adding the dry ingredients. To avoid overmixing and creating a dense batter, it’s best to alternate between adding the dry ingredients and the wet ingredients (such as buttermilk or milk) in small increments. Start by adding about one-third of the dry mixture to the wet mixture, and mix gently to combine. Then, add half of the milk and mix again. Repeat this process, ending with the dry ingredients. This gradual incorporation helps maintain the batter’s light texture. - Mixing Until Just Combined
The key to a light, fluffy chocolate cake is to mix until just combined. Overmixing can activate the gluten in the flour, leading to a tough, dense cake. Use a spatula or your mixer on low speed to combine the ingredients until you no longer see streaks of flour, but be sure to stop once everything is evenly mixed. The batter should be thick but smooth, with a slightly glossy appearance. - Checking the Consistency
The consistency of the batter is an important indicator of how the cake will bake. It should be pourable but not too runny. If it feels too thick, you can add a little more milk to reach the desired consistency. The batter should easily fall from a spoon but hold its shape when spread. If the batter is too thin, the cake layers may not hold up well during baking and could collapse. A thick batter gives your cake structure and helps keep the layers sturdy enough for the surprise reveal inside. - Adding the Surprise (Optional)
For a chocolate gender reveal cake, this is the step where you can hide the exciting surprise inside. Once the batter is prepared, divide it into separate bowls—one for each gender color, typically pink for a girl and blue for a boy. Gently spoon the colored batter into the center of the unbaked cake layers, creating a swirl or a bold “blob” of color in the middle. When the cake is baked and cut, this color will reveal the gender, adding an element of surprise for everyone at the party. - Tasting and Adjusting Flavor
Before baking, taste a small spoonful of the batter to ensure it has the flavor balance you desire. You should be able to taste the rich chocolate, along with a hint of sweetness. If you think it needs a little more flavor, feel free to adjust by adding a pinch more salt or vanilla extract. Some bakers like to add a small amount of espresso powder to enhance the chocolate flavor, as it deepens the richness of the cocoa.
By following these steps, you’ll have a perfectly prepared chocolate cake batter that is ready to be baked into delicious, moist layers for your gender reveal cake. Remember that the key to success lies in mixing the ingredients carefully and ensuring you don’t overwork the batter. The result will be a light, fluffy cake with a rich chocolate flavor—an ideal base for the exciting surprise inside!
Baking and Assembling the Layers
Once your chocolate cake batter is ready, the next crucial step is baking the layers and assembling them to create a stunning chocolate gender reveal cake. This part of the process involves carefully baking the cake layers to perfection, then stacking and assembling them in a way that ensures a seamless and visually impressive final product. Here’s a detailed look at the steps involved in baking and assembling the layers:
1. Baking the Cake Layers
Baking the cake layers is where your cake starts to take shape, and it’s essential to ensure the right texture and structure. Here are the key tips for getting perfectly baked layers:
- Preheat the Oven: Ensure that your oven is preheated to the right temperature, usually 350°F (175°C) for chocolate cake. A consistent oven temperature helps ensure even baking and prevents the cake from becoming too dry or uneven.
- Prepare the Pans: Grease and flour your cake pans (or line them with parchment paper) to ensure that the cake layers release easily once baked. If you’re making multiple layers, it’s a good idea to measure out the batter to ensure each pan has an equal amount, which will help the layers bake evenly.
- Bake Until Set: Pour the prepared batter into your pans, making sure to spread it out evenly. Place the pans in the center of the oven to ensure even heat distribution. Depending on the size of your pans, the cake should bake for about 25-35 minutes. You can check for doneness by inserting a toothpick or cake tester into the center of the cake—if it comes out clean or with a few moist crumbs, the cake is done. Avoid opening the oven door too often, as this can cause uneven baking or collapse.
- Cooling Time: After baking, remove the cake pans from the oven and let them cool in the pans for about 10 minutes. This short cooling time makes it easier to release the cake from the pans without it breaking. Afterward, transfer the cakes to a wire rack to cool completely before assembling and decorating. If you try to frost the cake while it’s still warm, the frosting will melt and slide off, ruining the design.
2. Leveling the Cake Layers
Once your cake layers have cooled completely, it’s time to level them to ensure they stack neatly and evenly. Leveling is especially important if your cake layers have domed on top during baking, which can make the layers uneven and cause the cake to lean when stacked. Here’s how to level your cake layers:
- Use a Serrated Knife or Cake Leveler: A serrated knife or a cake leveler tool is perfect for trimming the tops of your cake layers to make them flat. Place the cake on a flat surface, such as a cake turntable or a cutting board, and gently cut off the top of the cake in even horizontal layers. Be sure to remove just enough to create a flat surface without cutting too deeply into the cake itself.
- Keep the Trimmings for Snacking or Crumbs: Don’t throw away the top layers of the cake! You can set them aside and use them for cake crumbs or even enjoy them as a snack.
3. Filling the Layers with Frosting or Surprise Elements
At this stage, you can start assembling your cake by filling the layers. For a chocolate gender reveal cake, there are two main elements you may want to incorporate into the filling:
- Frosting Between the Layers: Apply a generous amount of frosting between each layer of cake. Smooth the frosting evenly using a spatula to create a consistent, even layer. This not only adds flavor but helps hold the layers together, ensuring the cake doesn’t fall apart when cut. You can use chocolate buttercream, vanilla buttercream, or even a light whipped frosting depending on your preference.
- Hidden Gender Reveal Surprise: This is the fun part! If you’re creating a gender reveal cake with a surprise inside, you’ll want to carefully place a small amount of colored cake batter (pink or blue, depending on the gender) in the center of each cake layer before baking. Once the layers are stacked, the reveal will be apparent when the cake is sliced. Alternatively, you can create a “surprise” by placing a small amount of confetti, sprinkles, or a filled surprise compartment (like a candy capsule or edible toy) in the center, which will fall out when the cake is cut.
4. Stacking the Cake Layers
Once your cake layers are leveled and filled, it’s time to assemble them into a tall, beautiful stack. Follow these steps to ensure the layers stack securely:
- Position the Layers: Place the first layer of cake on a cake board or serving plate. Use a little frosting to “glue” the cake layer to the board to prevent it from shifting. If your cake is large or multi-layered, consider using cake dowels or straws to support the layers and ensure they don’t collapse.
- Place the Second Layer: Carefully place the second cake layer on top of the first, aligning the edges so that the cake is straight and even. Gently press down to make sure the layers are securely in place.
- Repeat for Additional Layers: If you’re stacking more layers, repeat the process by adding frosting between each layer and aligning the cakes as you go. Be sure that each layer is level, which will help keep the cake stable. If the layers are not aligned, the cake can lean or be uneven when cut.
- Crumb Coat: Once the layers are stacked, apply a thin layer of frosting all over the entire cake. This is known as the “crumb coat” and serves as a base to catch any loose crumbs. Don’t worry about making this coat perfect; it’s just to create a smooth surface for the final layer of frosting. Chill the cake in the fridge for about 30 minutes to set the crumb coat before applying the final layer of frosting.
5. Chilling and Final Decoration
After assembling your layers, chill the cake briefly to set the frosting and ensure everything stays in place. This helps the cake firm up and makes the final decoration steps easier to execute. Once chilled, you can apply the final layer of frosting and proceed with any additional decorations, such as piping, fondant accents, or sprinkles.
By following these steps for baking and assembling your cake layers, you ensure that your chocolate gender reveal cake will be not only delicious but also structurally sound and beautiful. Whether you choose to add a surprise inside, decorate with frosting, or incorporate other creative elements, this careful approach will help you create a stunning centerpiece that will wow your guests and make the gender reveal moment truly unforgettable.
Adding the Gender Reveal Surprise
The gender reveal surprise is the heart of your chocolate gender reveal cake, transforming it from just a dessert into an exciting and memorable experience. This is the moment that will leave everyone gasping in awe, making it an essential element of your cake’s design. Whether you choose a colored filling that oozes from the center, a hidden surprise, or an innovative approach, there are several creative ways to add a surprise that will capture the excitement of the moment. Let’s take a closer look at how to seamlessly incorporate the reveal into your cake.
1. Colored Cake Batter Surprise
The most popular and traditional way to reveal the gender is by using colored cake batter inside the layers of the cake. When cut, the color reveals whether it’s a boy or girl. Here’s how to create this visual surprise:
- Prepare Separate Batter for Each Color: Once your chocolate cake batter is mixed and ready, divide it into two portions. Add food coloring to one portion of the batter—blue for a boy or pink for a girl. Use a gel-based food coloring, as it’s more concentrated and won’t alter the consistency of the batter.
- Layering the Colored Batter: When assembling the layers, spoon the colored batter into the center of each layer, being careful not to disturb the surrounding batter. You can create a swirl effect by adding a dollop of colored batter in the middle and gently swirling it into the surrounding chocolate batter, or you can keep it as a more defined spot of color in the center of each layer. When baked, this hidden color will only be revealed when the cake is cut, adding an element of surprise to the moment.
- Ensuring the Color Stays Hidden: The key to this surprise is to make sure that the colored batter stays within the center of each layer, so it’s not visible until the cake is sliced. If you are concerned about the color spreading out during baking, you can place a small amount of frosting or ganache around the colored batter to keep it contained. Be sure not to overfill the layers to prevent the batter from spilling over the edges.
2. Hidden Gender Reveal Confetti
Another fun and interactive surprise is to hide gender reveal confetti inside the cake. This approach works well if you want to add an extra layer of excitement as your guests eagerly await the reveal.
- Choosing the Right Confetti: Gender reveal confetti is available in various forms, such as small round shapes, hearts, or even gender-specific items like baby bottles or pacifiers. The confetti comes in either pink or blue, so you can match it to the gender of your baby.
- Hiding the Confetti: To incorporate confetti into your cake, cut a small section out of the middle of the cake layers and carefully fill it with the confetti before reassembling the layers. You can also sprinkle the confetti in between the cake layers before stacking them. Make sure the confetti is well-hidden, as it will only reveal itself when the cake is cut open. When sliced, the confetti will spill out, adding a fun and celebratory effect to the reveal.
- Tips for Success: Since confetti is usually small and lightweight, ensure that it doesn’t spill out prematurely. You may want to practice slicing the cake carefully to control the confetti flow. Be mindful of the size and weight of the confetti, as too much could cause the cake layers to collapse or be uneven.
3. Surprise Gender Reveal Balloons or Capsules
If you’re looking for an innovative and playful twist, you can hide a gender reveal balloon or a small edible capsule inside the cake. This creates a magical moment when the balloon pops or the capsule is discovered by the person cutting the cake.
- Edible Gender Reveal Capsules: Some bakeries and cake decorators use small, edible capsules filled with colored powder or sprinkles. When the cake is cut, the capsule is revealed, and the powder or sprinkles pour out, instantly revealing the baby’s gender. This option adds a unique touch and is a fun alternative to the typical colored batter method.
- Gender Reveal Balloons: For a dramatic effect, consider placing a small, inflated balloon inside the cake. The balloon will remain hidden inside until the cake is cut, and when it’s discovered, the balloon will pop, releasing colored powder or confetti. This moment can be a showstopper, especially when you film it or photograph the reaction of those present.
- Precautions for Balloon or Capsule Placement: When using a balloon or capsule, it’s essential to carefully carve a hollow area in the center of the cake layers large enough to hold the item without disrupting the cake’s structure. Be cautious not to let the balloon or capsule come into contact with the batter before baking, as it may create an uneven texture or affect the final result.
4. Surprise Gender Reveal Candy or Toy
Another creative approach is to place a gender reveal candy or small toy inside the cake, allowing the person cutting the cake to discover it. You can use a toy baby bottle, a pacifier, or even a small figurine as the surprise element. This method gives the reveal a tangible, memorable aspect, as guests can hold onto the surprise object after the cake is cut.
- Sealing the Surprise: Place the candy or toy in the center of the cake, either on top of the first layer or deep inside, depending on where you want the surprise to occur. Be sure to secure it with frosting or a layer of batter to prevent it from slipping or becoming visible before the cake is cut.
- Creative Additions: You could also use small candies that match the gender colors (e.g., pink or blue gumdrops or chocolate pieces) to enhance the surprise element. These can either be hidden within the cake layers or arranged decoratively on the top, adding both flavor and excitement to the reveal.
5. Serving the Cake for Maximum Impact
Once you’ve added the surprise element, it’s time to serve the cake. The way you cut and present the cake plays a significant role in the experience. Consider inviting the guests of honor to do the cutting, building up the excitement. As the knife sinks into the cake, the surprise will spill out, creating a moment of suspense and joy. Capture the reactions on camera to immortalize the moment for everyone to remember.
If you’re using a colored batter or confetti, make sure the person cutting the cake knows to do so gently to ensure the surprise is revealed smoothly without causing the cake to collapse. If you’ve used a balloon or candy, be sure the item is easy to retrieve and doesn’t disrupt the structural integrity of the cake.
By thoughtfully adding the gender reveal surprise inside the cake, you create an unforgettable moment that will be cherished by all who attend your party. The element of surprise, whether through colored batter, confetti, a hidden balloon, or a small toy, makes the cake not only a delicious treat but also an exciting part of the gender reveal celebration.
Frosting and Decorating the Cake
Frosting and decorating your chocolate gender reveal cake is where your creative vision truly comes to life. The frosting and decor not only enhance the cake’s aesthetic but also help to seal in the flavor and texture, creating a professional-looking, deliciously tempting masterpiece. Whether you prefer a sleek and modern look or a fun, whimsical design, this section will guide you through the key steps for frosting and decorating your cake to perfection.
1. Choosing the Right Frosting for the Job
The frosting you choose plays a crucial role in both the flavor and visual appeal of the cake. Since the focus of your gender reveal cake is on the surprise inside, the frosting should complement the chocolate cake without overpowering it. Here are some popular frosting options:
- Buttercream Frosting: Buttercream is a go-to for many cake decorators due to its versatility and ease of use. It has a smooth texture that’s perfect for spreading and piping. You can flavor it with vanilla, chocolate, or any other flavor that pairs well with your cake. A classic chocolate buttercream frosting is an excellent choice for a chocolate gender reveal cake, as it enhances the rich flavor of the cake without being overly sweet.
- Ganache: For a more decadent and glossy finish, consider using a chocolate ganache. Ganache is made from equal parts chocolate and cream and can be poured over the cake to create a smooth, shiny surface. It pairs beautifully with chocolate cake and gives a luxurious, glossy appearance that’s perfect for a special occasion.
- Whipped Cream: If you prefer a lighter, fluffier frosting, whipped cream is a great option. It adds a creamy texture without being too heavy and can be paired with the chocolate cake for a balanced, airy finish. Whipped cream can also be flavored with vanilla or even liqueurs for an extra layer of flavor.
- Fondant: For those looking for a smooth, polished finish, fondant is an ideal option. It can be rolled out to cover the entire cake, creating a sleek, professional appearance. Fondant also allows for more intricate designs, such as fondant flowers or geometric shapes. However, it tends to have a more neutral flavor, so you may want to combine it with a layer of buttercream underneath for added flavor.
2. Applying the First Layer of Frosting (The Crumb Coat)
Before applying the final layer of frosting, it’s essential to apply a thin base layer known as the “crumb coat.” This step helps lock in the crumbs and ensures a smooth, clean finish for the outer layer. Here’s how to do it:
- Apply a Thin Layer of Frosting: Using a spatula, spread a thin layer of your chosen frosting over the entire cake. Don’t worry about making it perfect; this layer is just to catch the crumbs and seal the cake.
- Smooth the Frosting: Once the crumb coat is applied, use a bench scraper or offset spatula to smooth the frosting, making it as even as possible. Don’t worry if it’s a little rough, as this will be covered in the next step.
- Chill the Cake: After applying the crumb coat, place the cake in the refrigerator for 15–30 minutes to allow the frosting to set. This will create a sturdy base for the final layer of frosting.
3. Applying the Final Layer of Frosting
After your crumb coat has set, it’s time to apply the final, thicker layer of frosting. This is where you can be as creative as you want, using techniques like piping, smoothing, or texturing. Here are some ideas:
- Smoothing the Surface: For a clean, sleek finish, use an offset spatula to spread the final layer of frosting over the cake, making sure to cover it completely. You can smooth the sides and top using a bench scraper to ensure the surface is perfectly even.
- Texturing the Frosting: If you prefer a more textured finish, you can create beautiful designs by dragging the spatula through the frosting in patterns such as swirls, waves, or vertical stripes. This adds dimension and visual interest to the cake.
- Piping Designs: To add more detail, use a piping bag fitted with various tips to create intricate decorations. Piped borders, flowers, or writing can elevate the look of your cake. You can pipe a border around the base and top of the cake for a more polished finish or add intricate floral designs that complement the overall theme.
- Ombre Effect: For a stunning visual effect, consider creating an ombre design by gradually fading the frosting color from light to dark. This works especially well if you’re using pink or blue for the gender reveal. You can achieve the ombre look by blending different shades of frosting on the cake’s surface and smoothing them out with a spatula.
4. Incorporating the Gender Reveal Theme
Since the cake is for a gender reveal party, incorporating the theme into the decorations is essential. This can be done through the color scheme, cake toppers, or other fun accents. Here are some ideas:
- Colored Sprinkles or Drip Effect: Add a touch of surprise and excitement with colored sprinkles or a drip effect in pink or blue (depending on the gender). You can drizzle colored ganache or icing over the top of the cake, letting it cascade down the sides for a beautiful, dramatic effect.
- Fondant Decorations: Fondant can be used to create more intricate decorations like baby-themed items (baby shoes, pacifiers, or onesies) or even geometric shapes. These can be placed on top of the cake or along the sides as part of the overall design.
- Toppers and Accessories: Add a personalized touch with cake toppers such as “It’s a Boy” or “It’s a Girl” signs, gender reveal balloons, or small figurines. These can either be placed on top of the cake or integrated into the cake’s side, depending on your design. For a more elegant approach, edible flowers or gold/silver leaf accents can add a touch of sophistication.
5. Final Touches and Embellishments
Once the main decorations are done, it’s time to add any final touches that will complete the look and make the cake even more eye-catching:
- Edible Glitter or Dust: For a magical, sparkling effect, sprinkle edible glitter or dust over the top of the cake. This can enhance the cake’s aesthetic, especially if you’re having a glamorous gender reveal party.
- Cake Drip and Candied Accents: For a modern touch, you can add a drip effect using colored ganache or caramel and finish with candies or meringue kisses. These elements add texture and make the cake look more dynamic.
- Edible Flowers or Fruit: Fresh flowers or edible fruit like berries or slices of citrus can add a burst of color and freshness to your cake’s design. Be sure to use only flowers that are safe for consumption, such as pansies, violets, or nasturtiums.
6. Chilling and Serving
Once you’ve finished frosting and decorating your cake, it’s important to allow it to set. If you’re using fondant, it’s best to let the cake sit at room temperature to avoid condensation. If you’ve used buttercream or ganache, you can place it in the refrigerator for 30 minutes to an hour to firm up the frosting.
When it’s time to serve the cake, make sure it’s at the right temperature. A chilled cake might be harder to cut through, while a cake that’s been out for a while may become too soft. Slice carefully to avoid disturbing the hidden surprise, and enjoy the reactions of your guests as they witness the gender reveal moment!
By following these steps for frosting and decorating your chocolate gender reveal cake, you’ll create a visually stunning centerpiece that not only looks amazing but also serves as the exciting focal point of your celebration. The right frosting and decoration can transform your cake into a work of art, setting the stage for a memorable gender reveal experience.
Tips for a Show-Stopping Gender Reveal Cake
How to Achieve Vibrant Colors
When it comes to a chocolate gender reveal cake, achieving vibrant colors is key to making the gender reveal moment visually stunning. The colors you choose, whether it’s pink for a girl or blue for a boy, will create a memorable and exciting experience for your guests. But getting the color just right isn’t always as simple as adding food coloring. The type of food coloring, the method you use, and the technique for incorporating it all play a significant role in ensuring the colors pop without affecting the texture or flavor of the cake. Here are the steps to achieve vibrant, eye-catching colors for your gender reveal cake.
1. Choose the Right Food Coloring
The first step in achieving vibrant colors is selecting the right food coloring. Not all food colorings are created equal, and some work better in baking than others. There are three main types of food coloring to choose from:
- Gel Food Coloring: Gel food coloring is often the best option for vibrant colors, especially when baking. It’s highly concentrated, so you only need a small amount to achieve rich, bright hues. Gel colors won’t dilute the batter or affect the texture of your cake, making them perfect for maintaining that smooth consistency while still giving you the bold colors you need. Gel food colorings are available in a wide range of colors and are ideal for creating vivid shades of pink or blue.
- Liquid Food Coloring: While liquid food coloring is commonly available, it tends to be less concentrated than gel coloring. You may need to use a larger amount to achieve the same vibrancy, which can potentially alter the consistency of your cake batter or frosting. Liquid food coloring can be a good option for frosting or drizzles but is not always the best choice for the cake batter itself, especially if you’re aiming for deep, intense colors.
- Powdered Food Coloring: Powdered food coloring is another option that can give vibrant results, especially when you want to avoid adding too much liquid to your batter. It’s highly concentrated and can be mixed into both frosting and cake batter. The key benefit of powdered food coloring is that it won’t alter the texture of your cake, as it doesn’t add any extra liquid. This can be particularly helpful when you’re working with delicate batters or when you want to keep your cake’s structure intact.
Tip: Look for food coloring that is specially designed for baking, as it will provide the best results for your cake and frosting without affecting the flavor or consistency.
2. Mixing and Adding the Color
Once you’ve selected your food coloring, it’s time to incorporate it into your cake batter or frosting. Here’s how to ensure the color is evenly distributed and vibrant:
- Start with a Small Amount: Always start by adding a small amount of food coloring to your batter or frosting, as it’s easier to add more color than to fix an overly saturated hue. If you’re aiming for a specific color, like pastel pink or a deep blue, it’s helpful to test a small portion of the batter first to gauge the final shade.
- Mix Thoroughly: After adding the food coloring, mix your batter or frosting thoroughly to ensure that the color is evenly distributed. For cake batter, use a spatula or whisk to gently fold in the color, making sure it doesn’t streak. You may need to scrape down the sides of the bowl to ensure that all the color is incorporated. For frosting, use a hand mixer or stand mixer for an even blend, especially if you’re using gel or powdered food coloring, which can sometimes take a little extra effort to mix completely.
- Use Multiple Layers for Intensity: If you want a more intense color, consider layering the color. For example, when making the batter for your chocolate gender reveal cake, divide it into portions and color each one separately. Once you bake the layers, the different colored layers will create a striking effect when the cake is cut open. If you’re creating an ombre effect, start with a light color and gradually deepen the shade as you work your way through the layers.
3. Testing and Adjusting Color
After mixing in your food coloring, it’s important to test the final color. The color may change slightly when the batter bakes, especially if you’re using certain shades like blue, which can appear darker after baking. Here’s how to ensure your colors stay vibrant:
- Test on a Small Amount: Take a small amount of the batter or frosting and place it on a white plate to see how the color appears. This gives you a better idea of how it will look once it’s baked. The color of the batter may look lighter than the final result, so it’s important to account for any changes during the baking process.
- Adjust the Color if Necessary: If the color is too light or not as vibrant as you’d like, simply add a little more food coloring and mix again. If you’re working with frosting, you can add more coloring until you achieve the desired shade. Be cautious, however, as too much food coloring could alter the consistency or flavor of your cake or frosting.
4. Maintaining Color in the Oven
One of the challenges of achieving vibrant cake colors is ensuring that the colors hold their intensity during the baking process. Here are some tips for keeping your colors vibrant even after baking:
- Baking Temperature: Avoid baking the cake at too high of a temperature. Excessive heat can cause the colors to become muted or even fade during baking. Stick to the recommended baking temperature for your recipe, usually between 325°F and 350°F, depending on the cake size and recipe.
- Avoid Overbaking: Overbaking the cake can also result in faded colors. Be sure to check the cake as it nears the end of its baking time, and use a toothpick or cake tester to ensure it’s fully baked without drying out.
- Cover the Cake: If you’re concerned that the cake might brown too much on the edges, you can loosely cover the cake with aluminum foil for the last few minutes of baking to prevent overbaking while allowing the center to finish cooking.
5. Creating Vibrant Frosting Colors
Vibrant frosting is just as important as vibrant cake batter in a gender reveal cake. Here’s how to create beautiful, vivid colors for your frosting:
- Start with White Frosting: To achieve the most vibrant results, start with a white frosting base. If you’re using a buttercream, whipped cream, or cream cheese frosting, make sure it’s light and airy before adding the food coloring.
- Gradually Add Food Coloring: Just as with the cake batter, it’s important to add food coloring gradually. Add small amounts of coloring at a time and blend thoroughly to avoid over-saturating the frosting. You can adjust the color as you go to achieve the perfect shade.
- Gel vs. Liquid Color in Frosting: Gel food colorings work well for frosting because they won’t thin it out. Liquid food coloring, on the other hand, may cause your frosting to become runny. To combat this, you can add a little more powdered sugar to thicken it back up.
Tip: If you’re creating a gender reveal cake with a specific theme, like ombre or marbled frosting, make sure to experiment with different shades of the same color. For ombre, mix several shades of pink or blue to achieve a beautiful gradient effect on the outside of your cake.
6. Using Vibrant Colors for Decorating
Vibrant colors don’t have to stop with the cake batter or frosting. You can also use them for the decorations, whether it’s sprinkles, edible glitter, or piping designs. Here’s how to create striking decorative elements:
- Piped Designs: When piping designs like rosettes, borders, or other intricate details, use gel food coloring to color your piping bags. You can create multi-colored designs or even blend different colors together for a dramatic effect.
- Sprinkles and Edible Glitter: Colored sprinkles or edible glitter can further enhance the vibrant look of your cake. Choose sprinkles that match your cake’s gender reveal colors or opt for metallic colors for an elegant touch.
By following these steps and tips, you’ll be able to achieve vibrant, bold colors that make your chocolate gender reveal cake not just a treat for the taste buds, but a visual masterpiece. The right colors will set the stage for an unforgettable gender reveal moment, creating excitement and anticipation for your guests when the cake is cut open.
Creative Decoration Ideas
Decorating a chocolate gender reveal cake is a chance to showcase your creativity and add a personal touch to the celebration. The decorations can make a huge impact on the overall look of the cake, turning it into a show-stopping centerpiece at the gender reveal party. Whether you prefer a subtle design or an elaborate display, there are endless possibilities to make your cake look beautiful while keeping the gender reveal surprise at the heart of the design. Here are some creative decoration ideas to inspire you.
1. Gender Reveal Color Drip Effect
One of the most dramatic and popular decoration techniques for a gender reveal cake is the drip effect. This technique involves creating a cascading flow of color on the top and sides of the cake, often in pink or blue to reveal the gender. The result is a striking visual that’s sure to wow your guests. Here’s how to create a drip effect:
- Use Ganache or Colored Icing: Start by making a ganache (chocolate and heavy cream) or use colored icing in your gender reveal color. For ganache, melt chocolate and mix it with cream until it’s smooth. Add food coloring to the ganache if you want the drips to be pink or blue.
- Drip the Ganache Over the Cake: Once your ganache is cool enough to drip but still pourable, gently pour it over the top of the cake. Let the ganache flow down the sides in a controlled manner. If the drip effect isn’t happening naturally, you can use a spoon to help direct the ganache where you want it.
- Let the Drips Set: Allow the drips to set for a few minutes before adding any additional decorations. This ensures they keep their shape and don’t run too much.
This simple yet effective decoration idea creates a vibrant, modern look that’s perfect for a gender reveal cake.
2. Whimsical Buttercream Flowers
Buttercream flowers can transform a simple cake into a stunning masterpiece. Piped buttercream flowers add a touch of elegance and can be tailored to match the theme of your gender reveal party. Consider these tips for a whimsical, flowery design:
- Use Piping Tips: To create detailed flowers, use piping tips like the petal tip (for roses and peonies) or a leaf tip to add green accents around the flowers. Start by piping the flower petals in layers, working your way from the center out. You can use pink or blue buttercream for the flowers, or even a blend of colors to create a more artistic look.
- Mix the Colors: You can create a beautiful ombre effect on the cake by varying the colors of the buttercream flowers. Start with darker shades at the base and gradually transition to lighter hues as you move up the cake, creating a gradient effect.
- Place the Flowers Strategically: Arrange the flowers around the sides of the cake for a lovely, cascading effect, or place them symmetrically on top for a more traditional look. Adding a few leaves or small floral accents around the base can also make the design look more lush and vibrant.
Buttercream flowers are not only beautiful but also give the cake a personal, handcrafted feel. This option is especially great if you’re going for a more elegant, sophisticated look.
3. Edible Glitter and Metallic Accents
For an extra touch of glamour and sparkle, consider incorporating edible glitter or metallic accents into your cake decorations. These details can make the cake look even more magical, giving it a dazzling, celebratory finish. Here’s how to incorporate these shiny elements:
- Edible Glitter: Sprinkle edible glitter over the top of the cake or along the edges of the drips for a sparkling effect. Gold, silver, pink, or blue glitter can complement your cake’s gender reveal colors. Make sure to use glitter that’s designed for food, as non-food glitter can be harmful if consumed.
- Metallic Dusting: Metallic food dust is another way to add a sophisticated and shimmering look to your cake. You can dust the sides or top of the cake for a soft, glamorous sheen. Consider using gold or rose gold for a more modern aesthetic or silver for a classic look.
- Metallic Foil: If you’re looking for a high-end finish, you can use edible metallic foil. Place the foil in small sections on the cake or use it to create a statement by covering an entire layer with gold, silver, or copper foil. This technique adds depth and a luxurious feel to your cake’s design.
These glitzy additions not only elevate the visual appeal of the cake but also give it a celebratory and festive vibe, making it feel extra special for the gender reveal.
4. Gender Reveal Cake Toppers
Cake toppers are an easy and effective way to add a fun, themed element to your gender reveal cake. Whether you prefer something simple or more elaborate, there are many topper options to choose from. Here are some ideas:
- “It’s a Boy” or “It’s a Girl” Toppers: A classic choice for a gender reveal cake, these toppers can be made from edible fondant, acrylic, or even wood. Placing a “It’s a Boy” or “It’s a Girl” topper on the top of the cake gives guests an immediate clue about the gender of the baby when they see it.
- Gender-Specific Figurines: Little figurines, such as baby shoes, a teddy bear, or a baby bottle, can be placed on top of the cake to represent the new arrival. You can even find figurines designed specifically for gender reveal parties, like ones that are blue or pink, or in the form of baby-themed items.
- Customizable Topper Messages: For a personal touch, create a custom topper with a message like “Oh Baby!” or “Our Little Surprise.” These can be made from a variety of materials, including fondant, wood, or acrylic.
Cake toppers are versatile and can be easily adapted to fit the theme and color scheme of your party, making them a great way to personalize your gender reveal cake.
5. Sprinkles, Confetti, and Candied Accents
Add texture and excitement to the surface of your cake with colorful sprinkles, confetti, or candied accents. These fun, playful decorations will make your cake stand out and get everyone talking. Here are some ideas:
- Sprinkles: Choose from a variety of sprinkles, including traditional round sprinkles, star-shaped sprinkles, or even themed sprinkles that match the gender reveal colors. You can scatter them across the top of the cake, along the base, or even around the cake layers for a dynamic and fun design.
- Confetti: Edible confetti is a great way to enhance the festive feel of the cake. Sprinkle colorful confetti on top of the cake, or you can even hide some inside the layers of the cake, so it’s revealed when the cake is cut.
- Candied Flowers or Fruits: Consider adding candied flowers or small fruits like berries, cherries, or even lemon slices for a refreshing, elegant touch. Candied fruits in blue or pink add an extra pop of color and sweetness that ties into the gender reveal theme.
By using these playful decorations, you’ll add texture and visual interest to the cake, making it not just a dessert, but an experience for your guests.
6. Personalized Details
For an even more special touch, consider adding personalized elements that reflect the parents-to-be. These could include:
- Baby Name or Initials: Decorate the cake with the baby’s name (if known) or the initials of the parents-to-be. You can use fondant letters, edible markers, or even piped frosting to spell out the name on the cake.
- Date of the Reveal or Due Date: Add the date of the gender reveal or the due date to the cake for a personal and memorable detail. This could be written on a fondant plaque or piped directly onto the cake.
- Messages of Love: A simple message of love, hope, or excitement can be piped onto the cake or written on a banner topper. This adds a warm, personal sentiment to the celebration.
By incorporating personalized details, you make the cake truly unique, turning it into a keepsake for the occasion.
These creative decoration ideas will help you take your chocolate gender reveal cake to the next level, ensuring it’s not only delicious but also visually stunning and memorable. Whether you choose a simple design or something more elaborate, the decorations should reflect the joy and excitement of the gender reveal party, making it a celebration to remember!
Common Mistakes to Avoid
When making a chocolate gender reveal cake, it’s easy to get caught up in the excitement and overlook some important details that could affect the outcome. While creating a beautiful and delicious cake for such a special occasion, it’s important to be aware of common mistakes that could compromise the cake’s texture, appearance, or the surprise reveal. Here’s a guide to help you avoid the most frequent errors so your cake turns out perfectly.
1. Using Too Much Food Coloring
One of the most common mistakes when making a gender reveal cake is using too much food coloring, especially when it comes to coloring the cake batter or frosting. While vibrant colors are crucial for the reveal, over-saturating the cake with food coloring can lead to several problems:
- Altered Flavor: Excessive food coloring can sometimes affect the flavor of the cake, giving it a slightly bitter taste. This is especially true for liquid food colorings, which can add moisture and change the balance of flavors.
- Unattractive Swirls: When too much food coloring is used, it can cause uneven coloration, leading to streaky or muddy swirls in the batter or frosting. For an even, vibrant color, always start with small amounts and gradually increase if needed.
Tip: Use gel food coloring for better control and more concentrated colors. Always add food coloring a little at a time and mix thoroughly to avoid over-saturating your cake.
2. Overbaking or Underbaking the Cake
Getting the baking time just right is essential for achieving a perfectly baked gender reveal cake. Overbaking or underbaking can lead to unwanted textures, making the cake either dry or undercooked.
- Overbaking: Overbaking can cause the cake to dry out, and the vibrant colors you’ve worked hard to achieve may fade. This can also result in a crumbly texture, which makes it harder to cut the cake and may affect the presentation.
- Undercooking: Undercooked cake batter can lead to raw spots in the middle, causing the cake layers to collapse when cut. In addition, if the cake is not fully cooked, the colors may not set properly and could leak or smudge when sliced.
Tip: Always follow the baking time specified in the recipe, and use a toothpick or cake tester to ensure the cake is fully baked. Start checking for doneness a few minutes before the suggested time to prevent overbaking.
3. Not Letting the Cake Cool Properly
When baking a gender reveal cake, it’s important to allow the cake layers to cool properly before frosting or assembling the cake. If you try to decorate a hot or warm cake, the frosting can melt, and the layers may shift or slide apart.
- Melting Frosting: Applying frosting to a warm cake can cause it to melt, making the cake look uneven and messy. The frosting may also slide off, causing the colors to blend and ruining the neat appearance of your cake.
- Layer Shifting: If the cake is still warm when assembling, the layers may not stick properly, causing them to slip. This can affect the overall structure of the cake and make it hard to achieve a clean, professional look.
Tip: Allow the cake layers to cool completely on a wire rack before frosting or assembling. If you’re in a rush, you can refrigerate the layers for about 30 minutes to speed up the cooling process.
4. Not Using the Right Frosting Consistency
The consistency of your frosting plays a critical role in the final appearance of the cake. If your frosting is too thin or too thick, it can be difficult to spread smoothly and may affect the look and texture of the cake.
- Too Thin Frosting: If the frosting is too runny, it may drip off the cake, especially if you’re trying to create a clean, sharp edge or smooth finish. This can also affect the color, especially if you’ve incorporated food coloring into the frosting.
- Too Thick Frosting: On the other hand, if the frosting is too thick, it can be difficult to spread evenly, and it may clump up. This can result in rough, uneven frosting surfaces that are hard to decorate.
Tip: If your frosting is too thick, add a small amount of milk or heavy cream to loosen it up. If it’s too thin, add powdered sugar a little at a time to thicken it. Test the consistency before applying it to the cake to ensure it spreads smoothly.
5. Not Layering Properly for the Reveal
The gender reveal element is one of the most exciting parts of making this cake, but improper layering can ruin the surprise. If the cake isn’t layered properly, the colored filling won’t be concealed inside the layers, and guests may not get the dramatic “reveal” moment when the cake is cut.
- Wrong Placement of the Colored Filling: If you don’t carefully hide the colored filling inside the cake layers, it can end up on the outer sides, where it’s visible before the cake is cut. This eliminates the element of surprise for your guests and takes away from the excitement.
- Uneven Layers: If the layers of your cake are uneven or poorly stacked, the colored filling might leak out, ruining the look and the reveal. Uneven layers can also affect the structure of the cake, making it difficult to frost or decorate.
Tip: When layering the cake, make sure the colored filling is placed in the center of each layer. Ensure the layers are evenly stacked and the filling is not too close to the edges to prevent it from spilling out. Also, you can freeze the layers before assembling to help them hold their shape better.
6. Skipping the Test Run
Creating a perfect chocolate gender reveal cake requires precision, and one of the biggest mistakes is not testing the recipe or the techniques before the event. Making a cake for the first time during the actual event can lead to unexpected problems that could have been easily avoided with a little preparation.
- Uncertainty with Recipe: If you’ve never baked this particular cake before, you might run into problems with the baking time, consistency of the batter, or even flavor. Test baking the cake will give you an opportunity to iron out any issues before the big reveal.
- Decorating Challenges: Decorating a complex cake can also be tricky, and without practice, you may struggle with techniques like frosting, piping, or creating the gender reveal surprise. This can lead to a frustrating experience on the day of the event.
Tip: Consider making a practice cake before the event to test out the recipe, techniques, and decorations. This will allow you to get a feel for the process and make any necessary adjustments ahead of time.
7. Overloading with Decorations
While it’s tempting to go overboard with decorations, sometimes less is more. Overloading the cake with too many decorations can distract from the main event—the gender reveal. The cake might end up looking cluttered, and the surprise element could be lost in all the design elements.
- Too Many Decorations: Adding too many toppings, such as sprinkles, flowers, or fondant accents, can overwhelm the cake. This might also make it difficult to see the beautiful colors inside when the cake is cut open.
- Distracting from the Reveal: The goal of a gender reveal cake is to focus on the color inside, so excessive external decorations may distract from the most exciting part of the event.
Tip: Keep the decorations balanced. Focus on a few key design elements that enhance the cake’s overall look and complement the gender reveal. Consider using simple accents like a clean drip effect or a beautiful buttercream design to let the surprise inside shine.
By avoiding these common mistakes, you can ensure that your chocolate gender reveal cake is not only delicious but also visually stunning and full of excitement for your guests. Careful planning, attention to detail, and proper techniques will help you create a show-stopping dessert that makes the reveal even more memorable.
Frequently Asked Questions About Gender Reveal Cakes
Can I Make This Cake Ahead of Time?
Yes, you can bake the layers and prepare the frosting ahead. Assemble the cake 1-2 days before the event and store it properly.
What is the best frosting for a gender reveal cake?
Buttercream or ganache works well for smooth, stable frosting that complements the rich chocolate flavor.
How do I hide the gender reveal surprise?
Carefully layer the colored filling in the center of the cake, ensuring it’s sealed inside to keep the surprise hidden.
How do I achieve vibrant colors for the reveal?
Use gel food coloring for concentrated, bright hues that won’t alter the cake’s flavor or texture.
What decorations should I add?
Keep it simple with a clean frosting finish, drips, or themed decorations like baby shoes or confetti sprinkles for a stunning reveal.
2 thoughts on “How to Make a Stunning Chocolate Gender Reveal Cake: Step-by-Step Guide”
Comments are closed.