

Have you ever dreamed of creating a luxurious, melt-in-your-mouth treat that captures the essence of Dubai’s indulgent culinary scene? Say hello to the Dubai Chocolate Bar—a sweet delight that combines rich cocoa, premium ingredients, and a touch of Middle Eastern flair. Whether you’re a dessert enthusiast, a home baker looking to impress, or simply someone with a sweet tooth, this recipe is your ticket to crafting gourmet chocolate bars that rival those from the finest patisseries.
Why settle for store-bought when you can whip up your own decadent creation? Imagine the aroma of velvety chocolate infused with hints of cardamom or the crunch of pistachios, all coming together in a bar that’s as beautiful as it is delicious. Perfect for gifting, entertaining, or treating yourself, this recipe is versatile, approachable, and oh-so-rewarding. Ready to dive into the world of homemade chocolate magic? Let’s get started!
Table of Contents
Key Benefits
When it comes to the Dubai Chocolate Bar, this recipe isn’t just about satisfying your sweet cravings—it’s about creating a luxurious experience that’s as rewarding to make as it is to eat. Here’s why this homemade chocolate bar deserves a spot in your kitchen:
- Rich in Antioxidants: Made with high-quality cocoa, this chocolate bar is packed with antioxidants that support heart health and boost your mood. It’s a treat you can feel good about!
- Customizable Indulgence: Whether you prefer dark, milk, or white chocolate, this recipe lets you tailor the sweetness and flavor to your liking. Add nuts, dried fruits, or even a sprinkle of sea salt for a personalized touch.
- Perfect for Gifting: Wrap these bars in elegant packaging, and you’ve got a thoughtful, handmade gift that’s sure to impress. It’s a taste of Dubai’s luxury, right from your kitchen.
- Versatile for Any Occasion: From dinner parties to cozy nights in, this chocolate bar is a crowd-pleaser. Pair it with coffee, wine, or fresh berries for a dessert that shines.
But the real magic? It’s surprisingly simple to make. With just a few premium ingredients and a little patience, you’ll be crafting gourmet chocolate bars that rival those from Dubai’s finest chocolatiers. Ready to elevate your dessert game? Let’s dive into the ingredients!
Ingredients
Creating the perfect Dubai Chocolate Bar starts with gathering the right ingredients. Think of this as your treasure chest of flavors—each component plays a key role in crafting a chocolate bar that’s rich, smooth, and utterly irresistible. Here’s what you’ll need:
Core Ingredients
- 200g High-Quality Cocoa Butter: The secret to that velvety melt-in-your-mouth texture.
- 100g Unsweetened Cocoa Powder: For that deep, luxurious chocolate flavor.
- 150g Powdered Sugar: Adjust to your preferred level of sweetness.
- 1 tsp Vanilla Extract: Adds a warm, aromatic note to balance the richness.
Flavor Enhancers (Optional but Highly Recommended)
- 50g Chopped Pistachios: For a nutty crunch and a nod to Middle Eastern flavors.
- 30g Dried Rose Petals: A fragrant, elegant touch that elevates the bar.
- 1/2 tsp Cardamom Powder: Adds a subtle, exotic spice that pairs beautifully with chocolate.
- Pinch of Sea Salt: Enhances the sweetness and adds a gourmet finish.
Tools You’ll Need
- Silicone Chocolate Molds: For creating perfectly shaped bars.
- Double Boiler: To melt the ingredients smoothly without burning.
- Whisk or Spatula: For mixing the chocolate to a glossy consistency.
- Cooling Rack: To let the bars set evenly.

Pro Tip: Quality Matters
Since chocolate is the star of this recipe, opt for the best ingredients you can find. High-quality cocoa butter and powder make all the difference in achieving that luxurious taste and texture. If you’re feeling adventurous, try adding a splash of orange zest or a drizzle of caramel for a unique twist!
With your ingredients ready, it’s time to transform them into something truly magical. Let’s move on to the step-by-step instructions!
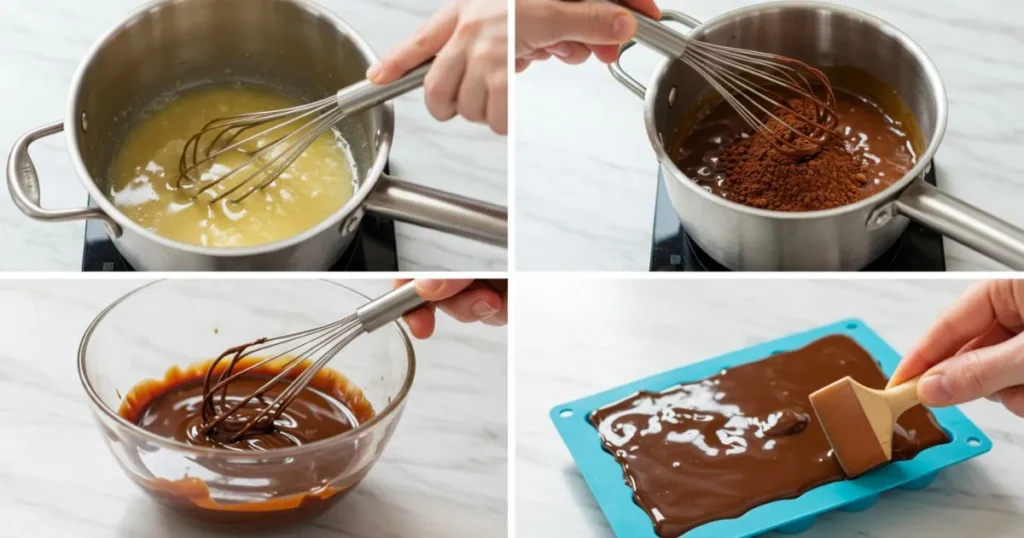
Instructions
Now that you’ve gathered your ingredients, it’s time to bring your Dubai Chocolate Bar to life! Don’t worry—this process is as fun as it is rewarding. Follow these simple steps, and you’ll have a batch of luxurious chocolate bars ready to enjoy in no time.
Step-by-Step Guide
- Prepare Your Workspace
- Line your silicone molds on a flat surface and ensure they’re clean and dry.
- Set up your double boiler by placing a heatproof bowl over a pot of simmering water (make sure the bottom of the bowl doesn’t touch the water).
- Melt the Cocoa Butter
- Add the cocoa butter to the double boiler and let it melt slowly, stirring occasionally. This ensures a smooth, even consistency.
- Incorporate the Cocoa Powder and Sugar
- Once the cocoa butter is fully melted, sift in the cocoa powder and powdered sugar. This prevents lumps and ensures a silky texture.
- Whisk gently until the mixture is glossy and fully combined.
- Add Flavor Enhancers
- Stir in the vanilla extract and cardamom powder (if using).
- If you’re adding nuts, rose petals, or sea salt, sprinkle them into the molds now for a layered effect.
- Pour and Set
- Carefully pour the melted chocolate into the silicone molds, filling them to the top.
- Tap the molds gently on the counter to remove any air bubbles.
- Let It Cool
- Place the molds on a cooling rack and let them set at room temperature for about 10 minutes.
- Transfer to the refrigerator for 1-2 hours, or until the bars are firm and easy to remove.
- Unmold and Enjoy
- Once set, pop the chocolate bars out of the molds. They should come out smooth and shiny.
- Store in an airtight container at room temperature or in the fridge for a firmer texture.
Pro Tips for Success
- Tempering Chocolate: For a professional finish, temper your chocolate by heating it to 45°C (113°F), cooling it to 27°C (80°F), and then reheating it to 31°C (88°F). This ensures a glossy snap.
- Avoid Moisture: Keep water away from your chocolate mixture, as even a drop can cause it to seize.
- Experiment with Layers: Pour half the chocolate into the molds, let it set slightly, then add a layer of nuts or dried fruit before pouring the rest.
With your chocolate bars perfectly set, it’s time to think about how to serve and enjoy them. Let’s move on to the next section for some creative ideas!
Pro Tips and Variations
Now that you’ve mastered the basics of making a Dubai Chocolate Bar, let’s take your chocolate-making skills to the next level! Whether you’re looking to experiment with flavors or troubleshoot common issues, these pro tips and creative variations will help you customize your bars and make them truly unforgettable.
Pro Tips for Perfect Chocolate Bars
- Tempering Like a Pro: If you want your chocolate bars to have that glossy finish and satisfying snap, temper your chocolate. Heat it to 45°C (113°F), cool it to 27°C (80°F), and then reheat it to 31°C (88°F). It’s a game-changer!
- Avoid Moisture at All Costs: Even a tiny drop of water can cause your chocolate to seize and become grainy. Keep your tools and workspace completely dry.
- Use a Thermometer: For precision, use a chocolate thermometer to monitor the temperature. This ensures smooth, melt-in-your-mouth results every time.
- Store Properly: Keep your chocolate bars in an airtight container at room temperature (around 18-20°C or 64-68°F). Avoid the fridge unless you prefer a firmer texture.
Creative Variations to Try
Why stick to one flavor when you can explore a world of possibilities? Here are some delicious twists to inspire your next batch:
- Spiced Chocolate: Add a pinch of saffron or cinnamon for a warm, exotic flavor that’s perfect for Dubai-inspired desserts.
- Citrus Zest: Mix in orange or lemon zest for a bright, tangy contrast to the rich chocolate.
- Caramel Swirls: Drizzle melted caramel into the molds before pouring the chocolate for a gooey, indulgent surprise.
- Vegan Option: Swap out dairy-based ingredients for coconut oil and almond milk to create a plant-based version.
- Nutty Delight: Add chopped almonds, hazelnuts, or walnuts for extra crunch and texture.
- Rose and Pistachio: Combine dried rose petals and crushed pistachios for a classic Middle Eastern flavor profile.
Troubleshooting Common Issues
- Grainy Texture: This usually happens if the chocolate gets too hot or comes into contact with moisture. Always melt it slowly and keep everything dry.
- Chocolate Won’t Set: If your bars are too soft, they may not have cooled long enough. Let them set in the fridge for an extra hour or two.
- Air Bubbles: Tap the molds gently on the counter after pouring the chocolate to release any trapped air.
With these tips and variations, you’re well on your way to becoming a chocolate-making pro. Ready to serve up your creations? Let’s move on to some stylish and delicious serving suggestions!
Serving Suggestions
Your Dubai Chocolate Bars are ready, and now it’s time to make them shine! Whether you’re hosting a dinner party, celebrating a special occasion, or simply treating yourself, these serving ideas will elevate your chocolate bars from delicious to downright dazzling. Let’s get creative!
1. Perfect Pairings
Pair your chocolate bars with complementary flavors to create a memorable dessert experience:
- Coffee or Tea: A rich espresso or a fragrant cup of chai tea enhances the chocolate’s depth.
- Wine: Dark chocolate pairs beautifully with red wine like Cabernet Sauvignon, while milk chocolate complements a sweet Moscato.
- Fresh Fruit: Serve with berries, sliced bananas, or orange segments for a refreshing contrast.
2. Dessert Plating Ideas
Impress your guests with a beautifully plated dessert:
- Chocolate Bar Trio: Offer a selection of dark, milk, and white chocolate bars on a sleek slate board.
- Garnishes: Sprinkle edible gold leaf, crushed pistachios, or rose petals for a touch of elegance.
- Drizzles: Add a swirl of caramel, raspberry coulis, or melted white chocolate for a gourmet finish.
3. Occasion-Worthy Presentations
Make your chocolate bars the star of any event:
- Gift Boxes: Wrap individual bars in gold foil and place them in elegant boxes tied with ribbon. Perfect for weddings, holidays, or corporate gifts.
- Dessert Table: Create a chocolate bar station with toppings like sea salt, nuts, and dried fruit for a DIY dessert bar.
- Party Favors: Miniature chocolate bars make adorable and delicious party favors for birthdays or baby showers.
4. Creative Serving Ideas
- Chocolate Fondue: Break the bars into chunks and melt them for a decadent fondue. Serve with marshmallows, pretzels, and fruit for dipping.
- Ice Cream Topping: Shave the chocolate bars over vanilla ice cream for a quick and indulgent treat.
- Hot Chocolate: Melt a bar into warm milk for the richest, creamiest hot chocolate you’ve ever tasted.
Pro Tip: Temperature Matters
For the best texture and flavor, let the chocolate bars sit at room temperature for 10-15 minutes before serving. This allows the flavors to fully develop and the chocolate to achieve its signature melt-in-your-mouth quality.
Conclusion
Congratulations—you’ve just created your very own Dubai Chocolate Bars! Whether you’re a seasoned chocolatier or a first-time baker, this recipe is a testament to how simple ingredients can transform into something truly extraordinary. With its rich flavors, luxurious texture, and endless customization options, this chocolate bar is more than just a dessert—it’s an experience.
Why This Recipe Works
- Luxury Meets Simplicity: Using high-quality ingredients ensures a gourmet result without complicated techniques.
- Endless Creativity: From spiced cardamom to rose petals, the variations let you put your personal stamp on every batch.
- Perfect for Any Occasion: Whether you’re gifting, entertaining, or indulging, these bars are versatile and always a hit.
Final Thoughts
Making chocolate at home might seem intimidating at first, but once you try it, you’ll see how rewarding and fun it can be. Plus, there’s something incredibly satisfying about biting into a chocolate bar you crafted with your own hands. So, why not make this recipe a regular part of your culinary repertoire?
Your Next Steps
- Share the Love: Package your chocolate bars as gifts for friends and family—they’ll be amazed by your skills!
- Experiment Further: Try new flavor combinations or even layer your bars with caramel, nougat, or cookie crumbs.
- Document Your Journey: Snap a photo of your creations and share them on social media. Tag us—we’d love to see your masterpiece!
Thank you for joining me on this chocolate-making adventure. I hope this recipe brings as much joy to your kitchen as it does to mine. Now, let’s address some common questions in the FAQs to ensure your chocolate-making journey is smooth and successful!
FAQs
Got questions about making your Dubai Chocolate Bars? Don’t worry—I’ve got you covered! Here are answers to some of the most common questions to help you troubleshoot, customize, and perfect your chocolate-making skills.
1. Can I use regular butter instead of cocoa butter?
While cocoa butter is ideal for achieving that smooth, glossy finish, you can substitute it with coconut oil in a pinch. Keep in mind that the flavor and texture might differ slightly.
2. How do I store homemade chocolate bars?
Store your bars in an airtight container at room temperature (around 18-20°C or 64-68°F). Avoid the fridge unless you prefer a firmer texture, as condensation can affect the chocolate’s shine.
3. Why did my chocolate turn grainy?
Graininess usually occurs if the chocolate gets too hot or comes into contact with moisture. Always melt it slowly using a double boiler and keep your tools completely dry.
4. Can I make these bars vegan?
Absolutely! Use dairy-free alternatives like coconut oil and almond milk, and ensure your cocoa powder and sugar are vegan-friendly. You’ll still get that rich, decadent flavor.
5. How long do homemade chocolate bars last?
When stored properly, your chocolate bars can last up to 2-3 weeks. If you add fresh ingredients like fruit, consume them within a week.
6. What’s the best way to add toppings or mix-ins?
For toppings like nuts or dried fruit, sprinkle them into the molds before pouring the chocolate. For mix-ins like caramel or cookie crumbs, layer them between two pours of chocolate for a stunning effect.
7. Can I use this recipe for chocolate molds with intricate designs?
Yes! Silicone molds work best for detailed designs. Tap the molds gently after pouring to remove air bubbles and ensure the chocolate fills every crevice.
8. My chocolate won’t set. What should I do?
If your bars are too soft, they may not have cooled long enough. Let them set in the fridge for an extra hour or two. Also, ensure you’re using the right ratio of cocoa butter to cocoa powder.
9. Can I use white or milk chocolate instead of dark chocolate?
Of course! Adjust the recipe by using white or milk chocolate chips or bars. Just melt them gently and follow the same steps.
10. What’s the secret to a glossy finish?
Tempering is key! Heat the chocolate to 45°C (113°F), cool it to 27°C (80°F), and then reheat it to 31°C (88°F). This process ensures a shiny, professional-looking finish.
Pro Tip: Have Fun!
Don’t be afraid to experiment and make this recipe your own. Chocolate-making is as much about creativity as it is about precision. Enjoy the process, and remember—every batch is a chance to learn and improve.
With these FAQs, you’re all set to create flawless Dubai Chocolate Bars every time. Happy chocolate-making!