
Who says gluten-free desserts can’t be indulgent, quick, and utterly delicious? If you’ve ever craved a sweet treat that fits your dietary needs without compromising on flavor, you’re in the right place. Whether you’re navigating a gluten-free lifestyle, catering to food allergies, or simply exploring healthier dessert options, these blissful bites are here to save the day—and your sweet tooth!
Imagine whipping up a dessert that’s not only easy to make but also packed with wholesome ingredients like almond flour, natural sweeteners, and fresh fruits. Perfect for busy weeknights or last-minute gatherings, this recipe proves that gluten-free baking can be both simple and satisfying.
Ready to create something magical in minutes? Let’s dive into these irresistible gluten-free desserts that will leave everyone asking for seconds!
Table of Contents
Key Benefits
Gluten-free desserts aren’t just a trend—they’re a delicious way to enjoy sweets while catering to your health and lifestyle needs. Whether you’re new to gluten-free baking or a seasoned pro, these desserts offer something for everyone. Here’s why you’ll love them:
- Healthier Indulgence: Made with nutrient-rich ingredients like almond flour, coconut oil, and natural sweeteners, these desserts are a guilt-free way to satisfy your cravings.
- Dietary-Friendly: Perfect for those with celiac disease, gluten intolerance, or anyone exploring a gluten-free lifestyle.
- Quick and Easy: No complicated steps or hard-to-find ingredients—just simple, wholesome recipes you can whip up in minutes.
- Versatile and Customizable: Swap ingredients, adjust flavors, and make these desserts your own. They’re perfect for any occasion, from family dinners to festive gatherings.
Imagine biting into a dessert that’s not only delicious but also aligns with your dietary goals. These gluten-free treats are here to prove that eating well doesn’t mean sacrificing flavor or fun. Ready to get started? Let’s move on to the ingredients you’ll need to create these blissful bites!
Ingredients
Creating these blissful gluten-free desserts starts with gathering the right ingredients. Don’t worry—you won’t need anything fancy or hard to find. Here’s everything you’ll need to make these quick, delicious treats:
Dry Ingredients
- 1 ½ cups almond flour: A gluten-free staple that adds a rich, nutty flavor and moist texture.
- ½ cup coconut flour: Perfect for balancing moisture and giving your desserts a light, fluffy feel.
- 1 tsp baking powder: Helps your desserts rise beautifully.
- ¼ tsp salt: Enhances the flavors and balances the sweetness.
Wet Ingredients
- ½ cup maple syrup or honey: Natural sweeteners that keep things healthy and delicious.
- ⅓ cup coconut oil (melted): Adds moisture and a subtle tropical flavor.
- 2 large eggs (or flax eggs for vegan): Binds everything together for the perfect texture.
- 1 tsp vanilla extract: A must for that warm, comforting dessert aroma.
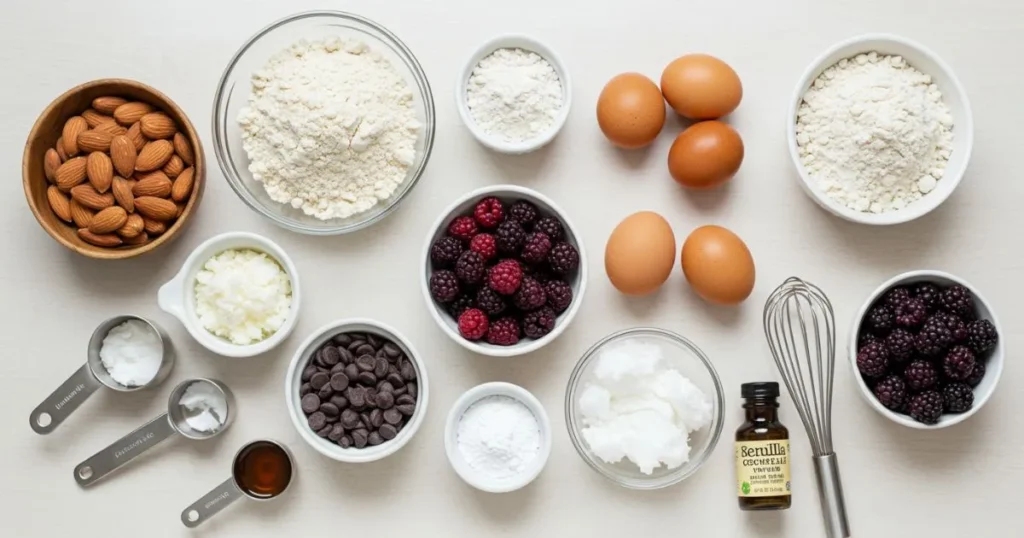
Optional Add-Ins
- ½ cup dark chocolate chips: For a decadent touch.
- ¼ cup chopped nuts (like walnuts or almonds): Adds crunch and extra flavor.
- Fresh berries or shredded coconut: Perfect for garnishing or mixing in.
Why These Ingredients Work
Each ingredient has been chosen for its flavor, texture, and nutritional benefits. Almond flour and coconut flour are gluten-free powerhouses, while natural sweeteners like maple syrup keep things refined-sugar-free. Plus, the optional add-ins let you customize the recipe to your taste—whether you’re a chocolate lover or a fan of fruity flavors.
Pro Tip:
If you’re new to gluten-free baking, make sure all your ingredients are certified gluten-free to avoid cross-contamination.
Now that you’ve got everything ready, let’s move on to the fun part—making these irresistible gluten-free desserts!
How to Make Gluten-Free Desserts
Ready to turn those ingredients into something truly magical? Let’s walk through the steps together. Don’t worry—this process is as easy as it is rewarding. Follow along, and you’ll have delicious gluten-free desserts in no time!
Step-by-Step Instructions
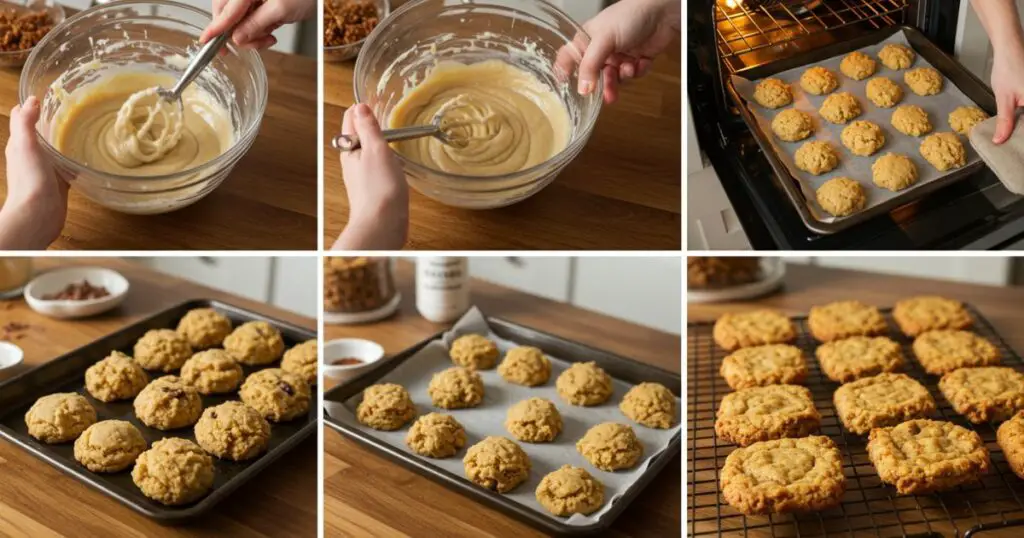
- Preheat and Prep
- Preheat your oven to 350°F (175°C).
- Line a baking tray with parchment paper or lightly grease it with coconut oil to prevent sticking.
- Mix the Dry Ingredients
- In a large mixing bowl, whisk together the almond flour, coconut flour, baking powder, and salt. This ensures everything is evenly distributed for the perfect texture.
- Combine the Wet Ingredients
- In a separate bowl, mix the melted coconut oil, maple syrup (or honey), eggs (or flax eggs), and vanilla extract. Whisk until smooth and well combined.
- Bring It All Together
- Gradually add the wet ingredients to the dry ingredients, stirring gently until a thick, cohesive batter forms. If you’re using add-ins like chocolate chips or nuts, fold them in now.
- Shape and Bake
- Scoop the batter onto your prepared baking tray, shaping it into small cookies, bars, or drop-style bites.
- Bake for 12–15 minutes, or until the edges are golden and the center is set.
- Cool and Enjoy
- Let your desserts cool on the tray for 5 minutes, then transfer them to a wire rack to cool completely. This helps them firm up and develop the perfect texture.
Pro Tips for Success
- Don’t Overmix: Gluten-free batters can become dense if overworked. Mix just until combined.
- Check for Doneness: Insert a toothpick into the center of a dessert—if it comes out clean, they’re ready!
- Customize Your Flavors: Swap chocolate chips for dried fruit, or add a dash of cinnamon for a warm, spiced twist.
Why This Method Works
This straightforward approach ensures your gluten-free desserts turn out moist, flavorful, and perfectly textured every time. By mixing the wet and dry ingredients separately, you avoid clumps and ensure even baking. Plus, the flexibility of this recipe means you can adapt it to suit your taste or dietary preferences.
Now that your kitchen is filled with the irresistible aroma of freshly baked desserts, let’s move on to some pro tips and variations to take your creations to the next level!
Pro Tips and Variations
Now that you’ve mastered the basics, let’s take your gluten-free desserts to the next level with some expert tips and creative variations. Whether you’re looking to switch up the flavors or troubleshoot common baking challenges, this section has you covered.
Pro Tips for Perfect Gluten-Free Desserts
- Measure Accurately: Gluten-free flours can be finicky, so use a kitchen scale or spoon-and-level method for precise measurements.
- Chill the Dough: If your batter feels too sticky, pop it in the fridge for 15–20 minutes. This makes it easier to shape and prevents spreading during baking.
- Avoid Overbaking: Gluten-free desserts can dry out quickly. Keep a close eye on them, especially during the last few minutes of baking.
- Experiment with Flavors: Add a teaspoon of citrus zest, a dash of cinnamon, or a splash of almond extract to customize the taste.
Delicious Variations to Try
- Chocolate Lover’s Dream
- Swap ¼ cup of almond flour for cocoa powder and add extra dark chocolate chips for a rich, decadent treat.
- Fruity Bliss
- Fold in fresh blueberries, diced strawberries, or dried cranberries for a burst of fruity flavor.
- Nutty Crunch
- Add chopped pecans, walnuts, or almonds to the batter for extra texture and a protein boost.
- Vegan-Friendly Version
- Use flax eggs (1 tbsp ground flaxseed + 3 tbsp water per egg) and ensure your chocolate chips are dairy-free.
- Seasonal Twists
- For fall, add pumpkin spice and a handful of pepitas. In winter, try peppermint extract and crushed candy canes for a festive touch.
Troubleshooting Common Issues
- Too Dry? Add a tablespoon of applesauce or a splash of plant-based milk to the batter.
- Too Crumbly? Ensure your eggs (or flax eggs) are well incorporated, as they act as a binder.
- Not Sweet Enough? Drizzle your finished desserts with a little extra honey or maple syrup before serving.
Why These Tips and Variations Matter
Gluten-free baking doesn’t have to be intimidating. With these tips and variations, you can confidently adapt the recipe to suit your preferences or dietary needs. Plus, experimenting with flavors keeps things fun and exciting!
Ready to serve up your creations? Let’s move on to some delightful serving suggestions that will make your desserts shine!
Serving Suggestions
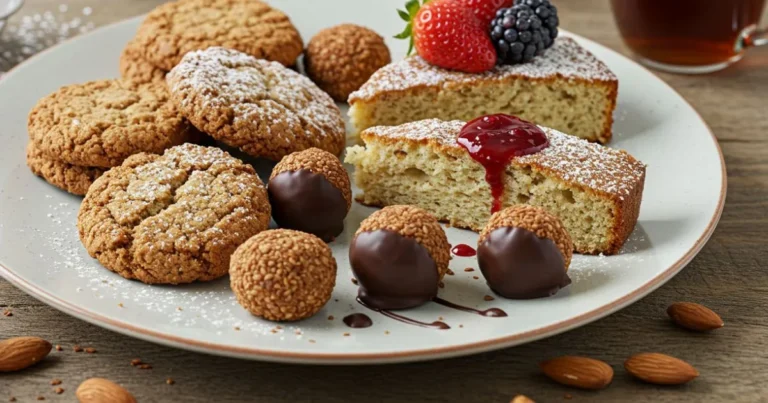
Now that your gluten-free desserts are baked to perfection, it’s time to make them shine! Presentation and pairing can take your treats from delicious to unforgettable. Here are some creative and practical serving ideas to impress your family, friends, or even just yourself (because you deserve it!).
Simple Yet Stunning Presentation Ideas
- Dust with Powdered Sugar: A light sprinkle of powdered sugar adds a touch of elegance and sweetness.
- Drizzle with Sauce: Try a drizzle of melted chocolate, caramel, or a berry compote for a gourmet touch.
- Add Fresh Toppings: Garnish with fresh berries, mint leaves, or edible flowers for a pop of color and freshness.
- Serve on a Platter: Arrange your desserts on a beautiful serving tray or cake stand for a professional look.
Perfect Pairings
- With Coffee or Tea: These desserts pair wonderfully with a cup of freshly brewed coffee, herbal tea, or even a chai latte.
- Ice Cream on the Side: Serve with a scoop of vanilla, coconut, or dairy-free ice cream for an indulgent dessert experience.
- Fruit Accompaniments: Fresh fruit slices or a fruit salad can balance the richness of your desserts.
Occasion-Specific Ideas
- For Parties: Create a DIY dessert bar with a variety of toppings like whipped cream, sprinkles, and chopped nuts. Let your guests customize their treats!
- For Brunch: Serve mini dessert bites alongside fresh fruit and yogurt for a sweet brunch addition.
- For Gifts: Package your desserts in cute boxes or jars, tied with a ribbon, for a thoughtful homemade gift.
Storage Tips
- Room Temperature: Store in an airtight container for up to 3 days.
- Refrigerate: For longer freshness, keep them in the fridge for up to a week.
- Freeze: These desserts freeze beautifully! Place them in a freezer-safe bag or container for up to 3 months. Thaw at room temperature before serving.
Why Serving Matters
The way you present and serve your desserts can elevate the entire experience. Whether it’s a casual family dinner or a special celebration, these ideas will make your gluten-free creations feel extra special.
Ready to dig in? Let’s wrap things up with a quick conclusion and answer some common questions to ensure your baking journey is as smooth as possible!
Section 6: Conclusion
Congratulations—you’ve just created delicious, gluten-free desserts that are as wholesome as they are indulgent! Whether you’re new to gluten-free baking or a seasoned pro, this recipe is proof that eating well doesn’t mean sacrificing flavor or fun.
Why This Recipe Works
- Simple and Accessible: With easy-to-find ingredients and straightforward steps, this recipe is perfect for busy bakers.
- Versatile and Customizable: From chocolate chips to fresh fruit, you can adapt these desserts to suit any craving or occasion.
- Healthy and Delicious: Packed with nutrient-rich ingredients, these treats are a guilt-free way to satisfy your sweet tooth.
A Final Word of Encouragement
Gluten-free baking can feel intimidating at first, but with recipes like this, it becomes a joyful and creative process. Don’t be afraid to experiment with flavors, textures, and presentations. Every batch you make is a chance to learn, improve, and enjoy the fruits of your labor.
So, the next time you’re craving something sweet, remember how easy it is to whip up these blissful bites. Share them with loved ones, savor them with your morning coffee, or stash a few in the freezer for a rainy day.
Thank you for baking along with me! If you have any questions or want to share your creations, feel free to reach out. Happy baking!
FAQs
Got questions? I’ve got answers! Here are some common queries about gluten-free desserts, along with practical tips to help you bake with confidence.
Can I use a different gluten-free flour?
Absolutely! While almond flour and coconut flour work beautifully, you can experiment with other gluten-free flours like oat flour, rice flour, or a gluten-free all-purpose blend. Just keep in mind that different flours absorb moisture differently, so you may need to adjust the wet ingredients slightly.
How do I make this recipe vegan?
It’s easy! Replace the eggs with flax eggs (1 tbsp ground flaxseed + 3 tbsp water per egg) and ensure your chocolate chips and other add-ins are dairy-free. The result will be just as delicious and perfectly vegan-friendly.
Why are my gluten-free desserts crumbly?
Gluten-free baked goods can sometimes be crumbly due to the lack of gluten, which acts as a binder. To fix this, make sure your eggs (or flax eggs) are well incorporated, and avoid overmixing the batter. Adding a tablespoon of applesauce or mashed banana can also help improve texture.
Can I freeze these desserts?
Yes, and they freeze wonderfully! Place them in an airtight container or freezer-safe bag, and they’ll keep for up to 3 months. Thaw at room temperature or warm them slightly in the oven before serving.
Are these desserts suitable for people with nut allergies?
If you’re avoiding nuts, swap the almond flour for a nut-free alternative like oat flour or a gluten-free all-purpose blend. Always double-check that your ingredients are processed in a nut-free facility to avoid cross-contamination.
How can I make these desserts less sweet?
If you prefer a less sweet treat, reduce the maple syrup or honey by 1–2 tablespoons. You can also balance the sweetness by adding a pinch of salt or a dash of citrus zest to enhance the flavors.
What’s the best way to store these desserts?
Room Temperature: Keep them in an airtight container for up to 3 days.
Refrigerator: Store in the fridge for up to a week to maintain freshness.
Freezer: Freeze for up to 3 months for longer storage.